infinite possibilities
The Cherry-Mx-Bitboard has been modified so that the SK6812mini is addicted to it with reference to helix.
Printed circuit board for self-made keyboard, one board corresponds to one switch.
Using this board, you can create a full-color backlit keyboard with an original layout without designing the board.
For example …!

Click here for details.
トッププレートの作り方を公開しました。
Languages
Infinite possibilities series
ProMicro House
ProMicro’s Pin can be taken out, with OLED, reset switch, TRRS for split keyboard, and M2 screw holes for mounting. TRRS pin assignments are Helix compatible.
Infinite possibilities series
There are multiple series of infinite possibilities, each with different corresponding LEDs and switch diodes. The specifications are summarized below.
| project | switch | Kailh socket availability | led | Through-hole diode | SOD-123 |
|---|---|---|---|---|---|
| Nexus | MX | No | SK6812MINI | Yes | No |
| Altana | MX | Yes | SK6812MINI | Yes | No |
| Suxen | MX | No | YS-SK6812MINI | Yes | Yes (*) |
| Container | MX | Yes | YS-SK6812MINI | Yes | Yes (*) |
| Choc | KailhLowProfile | No | YS-SK6812MINI | No | Yes |
(*) When using SOD-123 with Swen and container, one pad will be shared with the through hole hole due to space limitations, so it will be a little tricky implementation.
NOTE: YS-SK6812MINI is the same thing as SK-6812 MINI-E.
Material example (supplier)
- Arbitrarily cut plate
- 2mm acrylic board (Yusha Kobo) It would be nice to have an adhesive such as 3mm acrylic square lumber and acrylic sundae. (Home center)
- 3D case (DMM.make)
- 5mm cardboard (such as picked up from there)
- Switching diode 1N4148, SOD-123 (TALP Keyboard)
- SK6812mini, YS-SK6812MINI-E (Yusha Kobo)
- Kailh Socket (Yusha Kobo, Talpkeyboard, Kbdfans)
- Urethane enameled wire (recommended is 0.35 to 0.45mm. It is also available at home improvement stores. It is possible to use vinyl wire, but it will melt or be quite difficult)
- TRRS jack, RESET button (Mr. Akizuki Denshi)
- OLED (optional, Yusha Kobo)
- Promicro (Yusha Kobo, TALPkeyboard)
- Various spacers and screws (Hirosugi Keiki, Wilco, etc.)
- Key switches, keycaps (Yusha Kobo, TalpKeyboard, etc. according to your preference)
- USB cable, TRS (3.5mm3 pole) cable
In addition, tools such as a temperature control soldering iron, tester, and tweezers are required.
Pin assignment
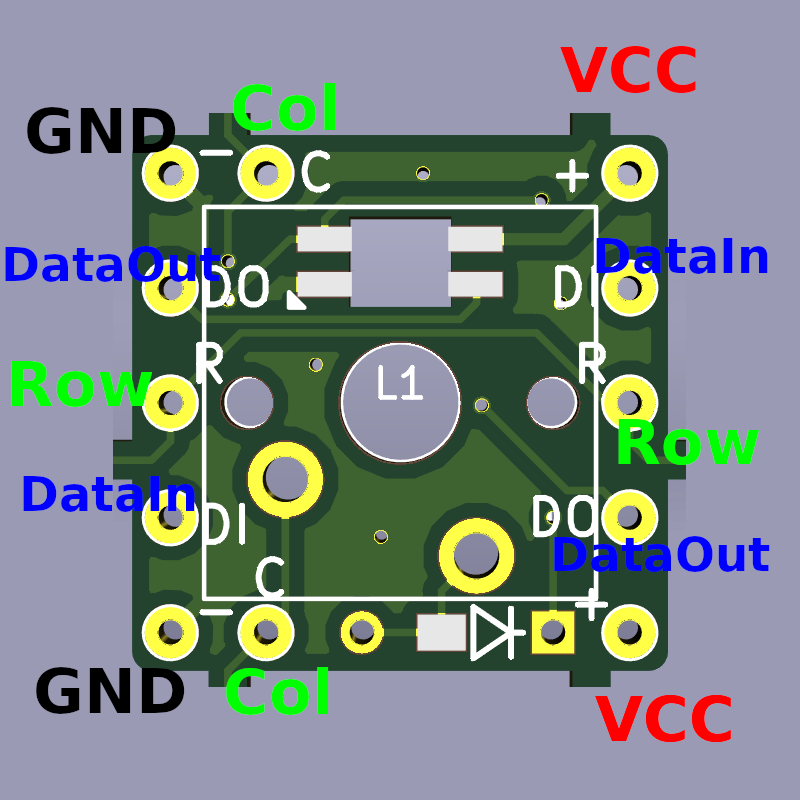
The pinouts of the infinite possibilities are:
- C: Horizontal line (Col)
- R: Vertical line (Row)
- DI: LED control signal input (DataIn)
- DO: LED control signal output (DataOut)
- -: Ground (for LED)
- +: VCC (5V for LED)
The example in the photo is Suxen, but the others are similar.
Assembly procedure
- Solder the SK6812mini. Solder at about 220 ° C with a temperature-controlled soldering iron. It will break if you lean on it. Use low-temperature solder with a melting point of 200 ° C or less.
- Solder the diode.
- Place the switch on the top plate and solder the switch legs on the back with endless possibilities. (Altana, Container is a socket) If you use a 2mm acrylic plate at this time, it is recommended to attach a 3mm acrylic square lumber to the side of the switch on the back of the plate with acrylic adhesive to prevent the switch from coming off.
- Wire the horizontal line (Col) and the vertical line (Row) according to the key matrix of the keyboard you want to build.
- Connect all “-“ and “+”.
- Wire from DI to DO in the order you want the LEDs to shine. 1st DO → 2nd DI → 2nd DO → 3rd DI…
- Solder TRRSJACK and RESET switch.
- Solder the OLED socket.
- Wire Col and Row, LED (DO), GND, VCC from the hole next to any pin for each of the infinite possibilities.
- Solder the Promicro to the socket. (You can use a con-through, but it is cheaper to replace the entire socket if it breaks.)
- Create and write firmware to your liking to complete. Firmware is very easy with QMK_Firmware . Reference: 3 types of means to prepare firmware for your own keyboard
Notes
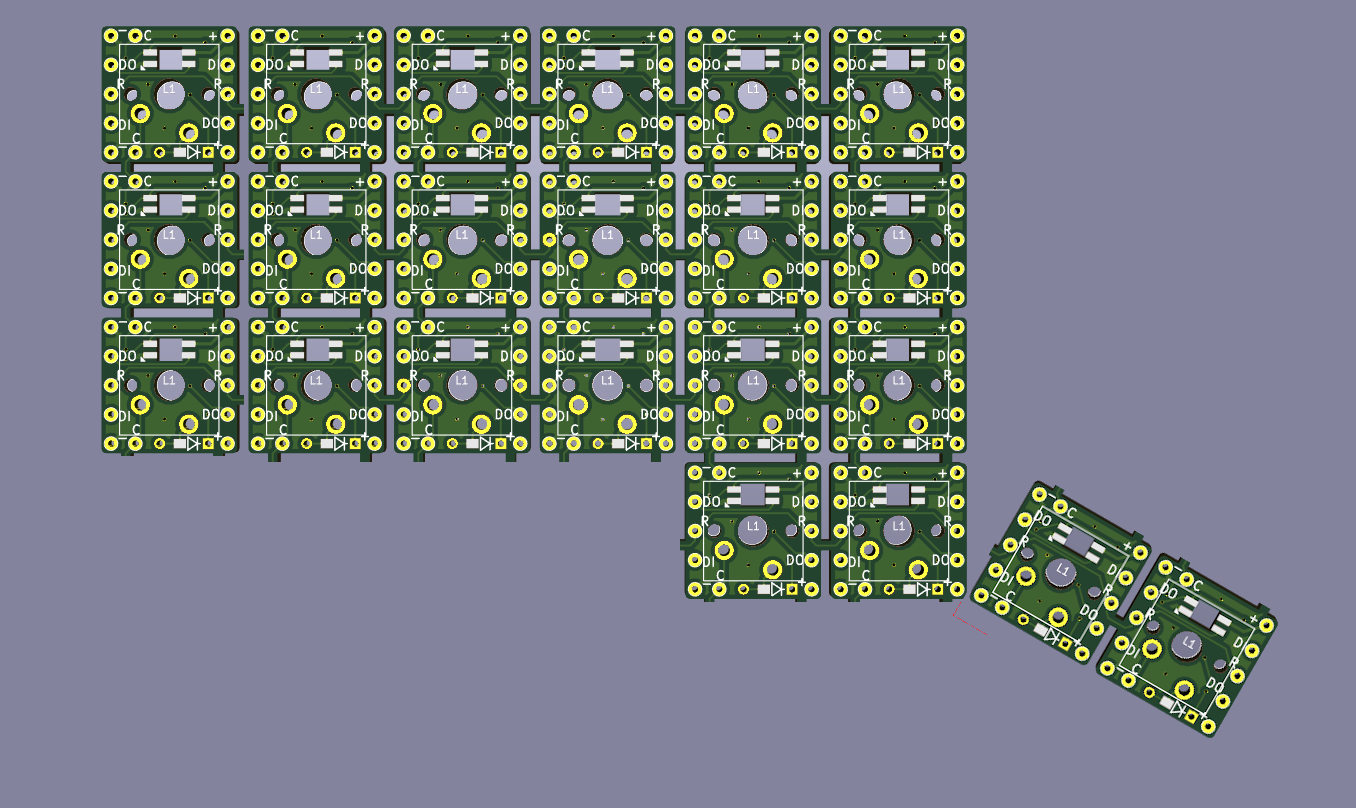
For example, in the case of the following arrangement in Suxen, the wiring will be as follows. Since it is quite difficult to remove the coating on urethane enamel wire (UEW), it is recommended to cut off the diode legs for wiring between adjacent boards, which are less likely to cause a short circuit.

Notes
- Nexus Altana, which has been in circulation since April 2019, has already been wired with Col, Row and vertical power lines (VCC, GND).
- Altana is a version that allows you to replace the switch using a Kailh socket.
- If, in the unlikely event that you do not need to illuminate the LED, you can wire only Col and Row to function as a keyboard. Wiring example
- In the case of sandwich mount keyboards, which are often used in Japan, the top plate and bottom plate are placed with spacers, but in the case of infinite possibilities, there is no space for spacers to enter between the keys. Make a screw hole on the outside of the key.
- If you solder the Promicro to the “house” first, the solder may leak from the hole when wiring to the infinite possibilities side, and the parts of the Promicro body may be short-circuited. Be sure to solder the Promicro last.
Ordering PCBs
Remember that the the manufacturers can change their requirements at any time!
The basic process is that you want to submit the ‘gerber’ files in a zip. In this repo, under each pcb folder (e.g. altana, container) there is a zip file. This is what you will add to your pcb order. Simply download it from this repo and attach to the order using the pcb manufacturer’s instructions.
Then, you configure whatever options they need and submit - crucially, the dimensions need to match the actual panel size.
PCB type | panel size — | — Altana | 94x94mm Choc | 88.5x84mm Container | 94x94mm Nexus | 94x94mm Suxen | 94x94mm (I pulled these by opening in Kicad and measuring - where not already dimensioned - edge-to-edge of the pcb design)
Elecrow
They will accept the panel design as-is.
Example order configuration (for Container)
- Layer: 2 layers
- PCB qty: 10 (gives you 250 pieces - the minimum is qty 5 - 125 pieces)
- Dimensions: 94x94mm
- PCB thickness: 1.6mm
- Castellated hole: no
- Surface finish: HASL
- Copper weight: 1oz
- Different design: 1
- File: container.zip
JLCPCB
If your order is rejected, they will contact you saying the slot sizes are too small (minimum tab connector size of 4mm), you can try mentioning to them that the last time someone ordered this PCB it printed fine.
Example order configuration (for Container)
- Base Material: FR-4
- Layers: 2
- Dimension: 95.7 mm* 95.7 mm 95.65mm* 95.65mm
- PCB Qty: 10
- Different Design: 1
- Delivery Fomat: Panel by Customer
- PCB Thickness: 1.6
- Impedance: no
- PCB Color: Green
- Silkscreen: White
- Surface Finish: HASL(with lead)
- Deburring/Edge rounding: No
- Outer Copper Weight: 1
- Gold Fingers: No
- Flying Probe Test: Fully Test
- Castellated Holes: no
At the end
If you use this board to build a keyboard, please let us know at @swan_match .
I support your EndGame! !
License
https://creativecommons.org/licenses/by/4.0/